The Making of
The Burnsville Town Center Quilt
Design .Construction.Installation
Design
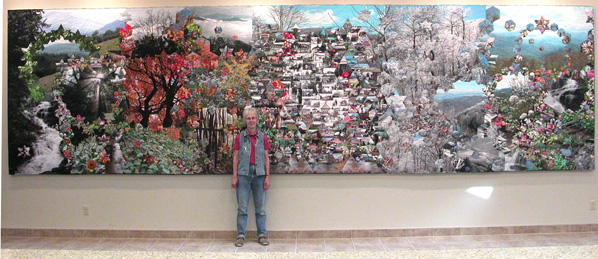
Depicting the four seasons in Yancey County seemed like the obvious
theme for the quilt. Ive always liked the name Princess SummerFallWinterSpring
from a childhood memory and decided to use that sequence to present the
seasons. The advantage to this was the two green seasons ended up on the
ends and I could sandwich the black and white History part between the
two seasons where the blending of color and imagery would work the best.
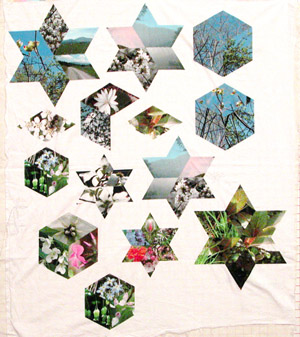
After experimenting with many quilt blocks, I decided to use the sixty
degree diamond because it makes three shapes: the tumbling block which
produces an optical illusion, a star, and a hexagon (which is the tumbling
block without the defined diamonds).
 |
|
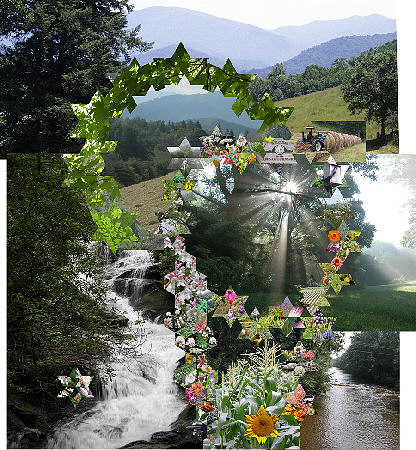
In Summer the rhododendron blossoms tumble down beside the
Roaring Fork Falls, while the green and flowers are our big stars. The
double star circle made by the green leaves and mountain scene is subtle
but effective. The Godrays depicted in the second strong circle were the
perfect balance for the Roaring Fork Falls on the left. I deliberately
positioned the Welcome to Burnsville sign above the sunbeams, which is
also where the two circles intersect. |
|
 |
|
 |
|
The stars give way to the tumbledown of Fall, so the diamond
becomes the tumbling block again in Fall. There is always at least one
magic day in fall when most of the leaves blow off the trees and the air
is full of leaves, and the experience is like being in a snowstorm with
very big snowflakes. I wanted to capture that feeling with the placement
of the falling stars and tumbling blocks, each of which contains pictures
of leaves. |
|
|
|
 |
|
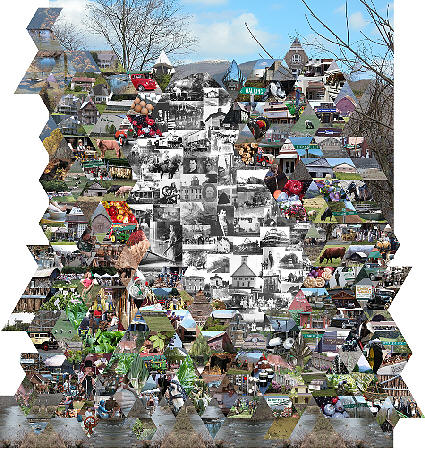
The diamond becomes both a tumbling block and a star in
the History section. It proved to be the ideal shape to capture all the
events that happen throughout the year. I decided to leave the historical
photographs in their traditional shapes. The black and white photos are
placed in the shape of Yancey County. |
|
|
|
 |
|
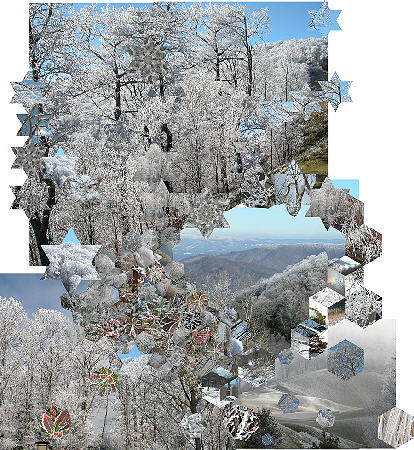
Winter with all its beautiful ice and snow was
a natural for the stars so they become prevalent again in this section
of the quilt, as well as hexagons. The shapes fall through winter like
snowflakes which in nature are hexagonal shapes. They cluster and pile
up, like snow, in the bottom third of the quilt. Ice crystals sparkle in
the sun when clinging to tree branches, so I focused on stars for the top
of this section. |
|
|
|
 |
|
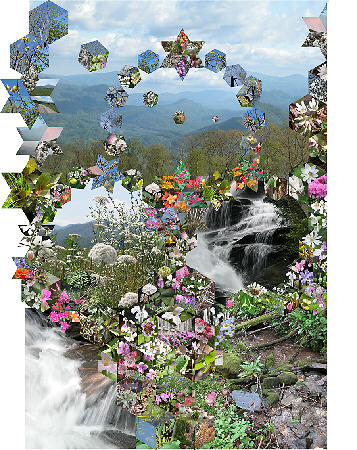
Spring has both tumbling blocks and stars. The
blocks falling away into the distant mountains hint at the transition and
return to summer. The water in spring flows underground through the wildflowers
and hints of snowmelt where it meets the winter section on the left and
the renewal of spring on the right. |
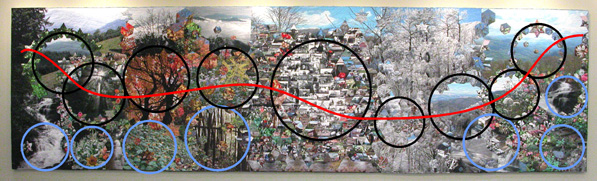
I decided to focus on circles as a secondary theme in the quilt since
I was using the four seasons which return in an endless cycle. I was happy
with the way the double star circle worked in the Summer section, and the
way the circles continued to appear, though subtlely in Fall and Winter.
The spring circles helped tie the imagery of the whole quilt together.
The tumbling blocks falling away into the mountains in spring hint at the
return to summer. Here the primary focus spots are depicted as black circles,
the red line shows the path your eye takes through the quilt, with the
suggestion that as it exits on the right it returns on the left. The blue
circles are the secondary focus spots.
I spent more than a year shooting the pictures for this quilt. Once
I had the pictures (I used a Nikon Coolpix digital camera), I used CorelDraw
to design the quilt. I would place the pictures on the page and move them
around on the computer screen until I was happy with the design. (For those
of you with a technical bent, the final total file sizes added up to 35.5
gigabytes. I had to buy an external hard drive just to back up the files
as they wouldnt fit on a DVD.)
Once I had settled on the design, I printed it out and stared at it
for a while. After I had showed it to many people, I had it printed on
fabric. Then I changed my mind about the design. I felt it wasnt strong
enough so I redesigned the entire quilt and had it printed again. This
is typical artist angst. I have the original printouts and must now decide
whether to go ahead and make them into seasonal quilts, cut them into smaller
pieces and make small quilts to sell, turn them into clothes, or just put
them in my cedar chest.
Design .Construction.Installation.Return
to top
Construction
To print the fabric, I export all the unique shapes and images as 300
dpi TIFF files and burn them onto a CD. I then send that CD along with
a list of the files and the exact physical size of each one to Chris Moore
(the printer) in New York. Sometimes I upload them using FTP. When I do
this, I convert the TIFF files to JPG files at the highest resolution.
The files are quite large and so cannot be emailed as attachments.
He then takes my computer files and prints them onto 100% cotton with
a huge inkjet printer made by Mimaki. Only instead of printing with ink,
he prints with fiber-reactive dyethe same dye with which commercial yardgoods
are printed. The fabric he uses has been pre-treated with a special chemical
to take the dye. After printing, he steams the fabric to set the color,
then he washes it. The result is colorfast and machine washable. The level
of color and detail is the best I have found and is the reason I use this
process.
I did have to print some last minute pieces on my home printer. For
that I used pre-treated fabric sheets made by EQ.
| When I get the fabric back, it is essentially yardgoods
with pictures all over it with at least a half inch of whitespace between
all of them. When I cut them apart, this leaves a quarter inch of white
around the image which becomes my seam allowance. When I sew the quilt
together, I use a 3/8 seam allowance so the white edge disappears. |
|
 |
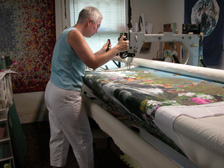
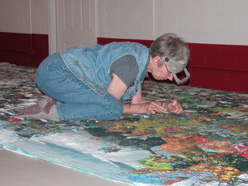
After each section of the quilt was pieced, it went to Rachel Reese
to be quilted. It took her 40 hours to quilt the entire quilt.
 |
|
Here you see Rachel quilting the spring section of the quilt.
The top, batting and backing are on three separate rollers. When she stands
on the side you see here she is looking straight down onto the surface
of the quilt and can guide the machine across the quilt, drawing as she
goes. |
For some quilts she can stand on the opposite side of the table. There
are handelbars on that side of the machine as well and a laser light that
can be guided across a pattern laid out on the white surface. The pattern
is slipped beneath a clear plastic sheet. While the quilter guides the
laser light across the pattern, the machine stitches the pattern onto the
quilt. You can buy patterns or draw your own. This feature was not used
on the Town Center quilt, however.
For the Town Center quilt, Rachel drew freehand with the machine directly
on the quilt as she went.
 |
|
When the sections came back, I would photograph them, then
put two sections at a time on the design wall and work out the transition
between the sections. (My thanks to my husband, Martin Webster and my nephew,
Erick Andrews who helped me to get the paired sections on and off the wall.)
The transitions were the one part of the quilt that I could not work out
on the computer. I had to puzzle them out in my head. I didn't know if
they were going to work until the quilt was finished and hung. |
More than once I had to undo what I had just spent 3 hours doing because
once the quilt was rehung on the design wall it puckered, or wouldnt hang
straight and I would have to remove stitches, repin and resew. In some
places I had to unquilt the quilt and cut away the backing and batting
to help reduce the bulk. The transition pieces were all quilted separately
so that when they were sewn onto the quilt everything would still be quilted.
This was necessary because once the quilt sections were sewn together they
were too big to get under a sewing machine or back onto the long-arm qulting
machine.
| I had to hand applique many of the pieces of the quilt and
went through so many movies while working that I lost count. |
|
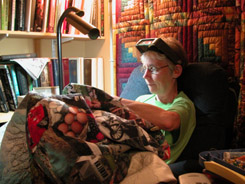 |
After I had all the edge pieces sewn to each section, I checked the
height of the quilt to make sure top and bottom edges were even. When they
werent, I had to trim one of the sectionsa very scary endeavor. My thanks
to Barbara Bradley who helped me measure all the sections and gave me the
courage to trim them.
I think I fretted almost as much about whether the quilt was going to
fit together and hang straight as I did about the design itself. When a
quilt is quilted, it draws up an unpredictable amount and I knew the sections
would not match exactly. However, they matched so closely that I was greatly
surprised. It is a testimony to the thoroughness and evenness of Rachels
quilting, and possibly to the wonders of computer precision.
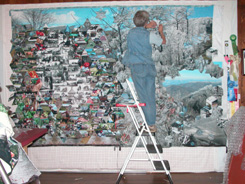
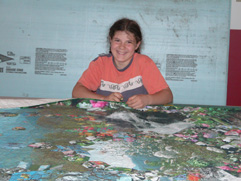
Eventually the quilt became too big for me to put it on the design wall
and at that point I had to move construction to the Town Center where I
could lay out the entire quilt on tables to work on it. Even though I knew
how big the quilt was, the first time I actually saw it all laying out
on the tables, I was flabbergasted.
 |
|
The quilt was sewn together by hand. I couldnt get my hand
beneath the quilt, so all the stitches had to be made from the top. This
was really difficult and I bent a LOT of needles. I climbed onto the tables
and sat on the quilt while sewing it together. |
| The bindings were put on before the sections were sewn together so
that once together, I just had to connect the bindings. This meant unsewing
them a few inches, attaching the bindings from the different sections to
each other, then resewing them to the quilt. If the sections had not all
been exactly the same height, this would not have worked. The bindings
are attached to the quilt with a sewing machine but then must be folded
around the edge and hand stitched to the back. That was 66 feet of binding
that had to be hand sewn. Maryallen Estes, Barbara Bradley and Mira Watkins-Brown
(at right) helped me with the handsewing. |
|
 |
Design .Construction.Installation.Return
to top
Installation
 |
|
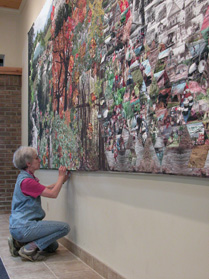
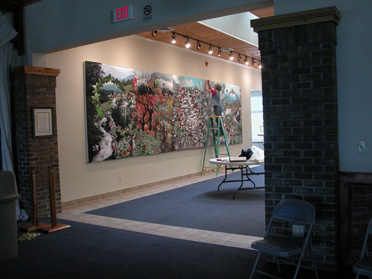
The quilt is attached to the wall with stainless steel pins
to 2 blueboard which is wrapped with fire-retardant fabric made by Glen
Raven. I mounted it this way to keep the quilt from sagging over time.
In this picture husband Martin (dark blue shirt) and George Nero, (Town
Center manager) are helping me install the quilt (it was very heavy). |
|
|
|
  |
|
|
|
|
|
I appreciate all those who volunteered to help with the quilt and who
shared so many wonderful stories and so much rich history with me. I hope
the quilt will play a small part to remind us of our rich heritage and
encourage us to honor and preserve it. If we protect and nurture the mountains,
they will protect and nurture us.
Design .Construction.Installation.Return
to top
|